Amazon EKS Cluster Setup using eksctl

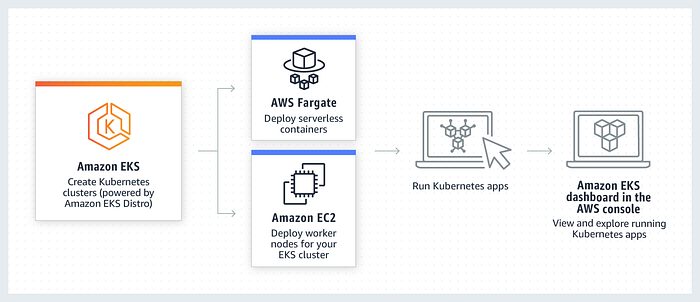
Amazon Elastic Kubernetes Service (Amazon EKS) is a managed Kubernetes service to run Kubernetes in the AWS cloud and on-premises data centres. In the cloud, Amazon EKS automatically manages the availability and scalability of the Kubernetes control plane nodes responsible for scheduling containers, managing application availability, storing cluster data, and other key tasks. With Amazon EKS, you can take advantage of all the performance, scale, reliability, and availability of AWS infrastructure, as well as integrations with AWS networking and security services. On-premises, EKS provides a consistent, fully-supported Kubernetes solution with integrated tooling and simple deployment to AWS Outposts, virtual machines, or bare metal servers.

Prerequisites:
- aws cli
- kubectl
- Eksctl
- Required IAM Permissions to Instance
Terms
Kubectl
Kubectl is a command line tool that you use to communicate with the Kubernetes API server. The kubectl binary is available in many operating system package managers. Using a package manager for your installation is often easier than a manual download and install process.
Eksctl
eksctl is a simple CLI tool for creating and managing clusters on EKS - Amazon's managed Kubernetes service for EC2. It is written in Go, uses CloudFormation, and was created by Weaveworks.
Steps:
First, we are going to launch a Linux instance (t2 micro), this instance is used to manage the k8s cluster and give all the necessary instructions to the Kubernetes cluster using EKSCTL and KUBECTL utility.
Select the instance and click on the Connect.
Copy the ssh command to connect to the instance.
we can connect Ec2 instances using different software such as putty, moboxtrem etc.
But I am connecting from the command prompt in Windows 11. paste the ssh command.
Install the unzip and curl packages.
sudo apt update && sudo apt install unzip curl -yAWS CLI Installation
The Below commands will download the binaries and install the AWS CLI in your instance or override in case you have the older one. After Installation, Check the AWS CLI Version.
Better to refer below link to download the current AWS CLI version:
https://docs.aws.amazon.com/cli/latest/userguide/getting-started-install.html
curl "https://awscli.amazonaws.com/awscli-exe-linux-x86_64.zip" -o "awscliv2.zip"
unzip awscliv2.zip
sudo ./aws/install
aws --version
Kubectl Installation
Download the kubectl binary for your cluster's Kubernetes version from Amazon S3.
- Kubernetes
1.28
You can refer to the below link for more details:
https://docs.aws.amazon.com/eks/latest/userguide/install-kubectl.html
curl -O https://s3.us-west-2.amazonaws.com/amazon-eks/1.28.2/2023-10-17/bin/linux/amd64/kubect(Optional) Verify the downloaded binary with the SHA-256 checksum for your binary.
- Download the
SHA-256checksum for your cluster's Kubernetes version from Amazon S3 using the command for your device's hardware platform. The first link for each version is foramd64and the second link is forarm64.
- Kubernetes
1.28
- Check the
SHA-256checksum for your downloaded binary with one of the following commands.
Apply to execute permissions to the binary.
curl -O https://s3.us-west-2.amazonaws.com/amazon-eks/1.28.2/2023-10-17/bin/linux/amd64/kubectl.sha256
sha256sum -c kubectl.sha256
chmod +x ./kubectl
Copy the binary to a folder in your PATH. If you have already installed a version of kubectl, then we recommend creating a $HOME/bin/kubectl and ensuring that $HOME/bin comes first in your $PATH. After you install kubectl, Check kubectl version.
mkdir -p $HOME/bin && cp ./kubectl $HOME/bin/kubectl && export PATH=$HOME/bin:$PATH
kubectl version --client
eksctl Installation
Now, install eksctl by executing the below command for Linux machines, for other OS refer to the link below:
https://eksctl.io/installation/
# for ARM systems, set ARCH to: `arm64`, `armv6` or `armv7`
ARCH=amd64
PLATFORM=$(uname -s)_$ARCH

curl -sLO "https://github.com/eksctl-io/eksctl/releases/latest/download/eksctl_$PLATFORM.tar.gz"

# (Optional) Verify checksum
curl -sL "https://github.com/eksctl-io/eksctl/releases/latest/download/eksctl_checksums.txt" | grep $PLATFORM | sha256sum --check

tar -xzf eksctl_$PLATFORM.tar.gz -C /tmp && rm eksctl_$PLATFORM.tar.gz

sudo mv /tmp/eksctl /usr/local/bin

eksctl versioncurl -sLO "https://github.com/eksctl-io/eksctl/releases/latest/download/eksctl_$PLATFORM.tar.gz"
IAM Role Creation
Now, it’s time to create an IAM Role with the required permissions and attach it to the Linux EC2 Instance.
Goto AWS Management console IAM -> Roles -> Create Role
Select the AWS service and use case with EC2. Click on Next.
Add the below permissions
AdministratorAccess
AmazonEC2FullAccess
AWSCloudFormationFullAccess
IAMFullAccess
Give the role name as eks_role, and get created with the below permissions attached, I am giving full access but you can refine the permission-related things at your end accordingly.
At the backend, the EKSCTL utility is using CloudFormation to do all the cluster creation, so the EC2 machine must have all the required permissions to perform the actions. Click on Create Role.
Eks_role is created Successfully.
Now, assign the role to the EC2 Linux instance.
Select the eks-role and click on Update IAM role.
EKS Cluster Creation
Now, using eksctl utility, we are going to create an EKS Cluster
This will create a cluster with the name “devops-voyager” in the Mumbai region with 2 worker nodes of type t2.micro.
Please be aware. this does not come for free-tier.
eksctl create cluster --name devops-voyager --region ap-south-1 --node-type t2.microSuccessfully created the EKS cluster with 2 worker nodes. It takes approximately 10 min.
we can get the list of clusters as follows
eksctl get cluster --region ap-south-1We can get the list of Node groups as follows
eksctl get --cluster devops-voyager nodegroup --region ap-south-1Now, it’s time to validate the cluster using a few Kubernetes commands using kubectl utility.
we can get the list of nodes as follows.
kubectl get nodeswe can create a nginx deployment as follows
kubectl create deployment web-app --image=nginx --port=80 --replicas=2
kubectl get deployment
kubectl get replicaset
kubectl get pods
we can create a service as follows. Internally load balancer will be created. Copy the External-IP.
kubectl expose deployment web-app --port=80 --type=LoadBalancer
kubectl get services
Paste the External-IP in the browser to access the nginx.
We can delete the service and deployment as follows:
kubectl delete service web-app
kubectl delete deployment web-app
kubectl get all
we can delete the eks clusters as follows
eksctl delete cluster devops-voyager --region ap-south-1verify whether the cluster is deleted or not as follows.
eksctl get cluster --region ap-south-1Thanks for reading! I hope you found this helpful and informative.
I’m always happy to connect with fellow tech enthusiasts and answer any questions you may have. Don’t forget to follow me for more updates on tech, programming, and more.😄😄


